Content:
- 一. 基本概念
- 二. 多进程Multiprocessing
- 三. 多线程Threading
- 四. 多进程与多线程的选择
- 五. 异步I/O
- 六. concurrent.futures模块
- 参考文章
一. 基本概念
1. 同步和异步
同步和异步的概念是调用者执行调用后对结果的获取处理方式
同步Synchronize:调用函数后,由调用者主动查询返回的调用结果。
- 一直等待就是堵塞
- 如果用轮询等方式查询,即为非堵塞
异步Asynchronize:调用者发出调用后就转而继续执行其他操作,不查询调用结果。当调用完成后,所调用的函数会通过通知或回调的方式来通知调用者。对于异步调用,调用的返回并不受调用者控制。
通知:
当被调用者执行完成后,发出通知告知调用者,无需消耗太多性能。
回调:
与通知类似,当被调用者执行完成后,会调用调用者提供的回调函数。
2. 阻塞和非阻塞
阻塞和非阻塞的概念是程序(线程)在等待结果的状态而言
阻塞blocking:是指当前线程会被挂起,在调用结果返回之前不执行任何代码。
非阻塞non-blocking:是指当前线程不会死等结果返回,在调用结果返回之前会执行其他代码。
3. 并发和并行
并发Concurrency: is about dealing with lots of things at once即一次处理多件事。
并行Parallelism: is about doing lots of things at once即一次执行多件事
从解释上来说,他们都是要解决事情,但处理手法不同。下面的图很好解释了什么是并发和并行。
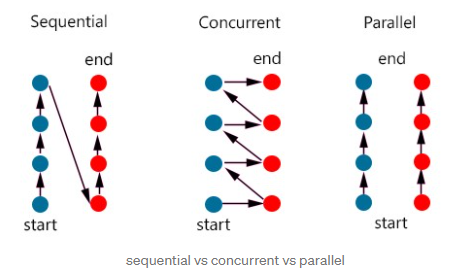
通俗理解,并发是两车道的车要交替进入一个高速入口匝道。从该入口的角度来看,是同时在处理两条车道进入高速入口的事情。如果车辆间隔大,通过速度快,从结果上看就觉得是并行通过。但并行执行起来就简单粗暴,直接多开一个高速入口匝道将其变成两条车道两个入口,车辆不再需要交替进入高速入口。
并发是从结构上提供一个方法去解决如何并行化的问题。真正的并行是需要多核心。
在Python中,并发或并行的应用模块如下:
- 并发:threading,asyncio
- 并行: multiprocessing
二. 多进程Multiprocessing
在Python中,multiprocessing就是一个跨平台的多进程包。
1. Process对象
在multiprocessing中,可通过Process类创建一个进程对象,譬如:
from multiprocessing import Process

def f(name):
    print('hello', name)

if __name__ == '__main__':
    p = Process(target=f, args=('bob',))
    p.start()
    p.join()
1.1 启动进程的方式
有三种方式,分别是:
spawn:父进程会创建一个新的进程,该子进程只会继承运行run()的必要资源。由于要进行操作符和句柄的筛选,执行速度会慢于fork和orkserver的方法。可用在Unix and Windows。是Windows和macOS的默认启动方式。
fork:父进程使用os.fork()的方法直接复制一个进程,该子进程会继承父进程的所有资源。只能用在Unix。是Unix的默认启动方式。
forkserver:当程序启动选择该方式,一个服务器进程将会被启动。当需要新的进程,父进程会向该服务器请求是否能fork一个新进程。只支持能使用Unix pipes描述符的Unix平台。
显然易见,在Unix和Windows操作系统都有进程,但在操作方式略有不同。Unix/Linux操作系统可以提供了一个叫fork()的系统调用。它非常特殊。普通的函数调用是调用一次,返回一次。但是fork()是调用一次,返回两次。因为操作系统自动把当前进程(称为父进程)复制了一份(称为子进程),然后分别在父进程和子进程内返回。
- 当调用
fork()时,父进程和子进程都会从调用处开始往后执行,即都会执行fork()。子进程返回0,而父进程返回子进程的ID。 getppid()可以得到父进程的ID,getpid()是获取当前进程的ID。在父进程如要获取子进程的ID只能是通过在fork()时得到的变量。- 子进程还能继续fork。
- windows系统是没有fork调用,所以不能使用
fork()
例子(只适用于Unix/Linux/Mac,windows会报错)
import os

print('Process (%s) start...' % os.getpid())
# Only works on Unix/Linux/Mac:
pid = os.fork()
if pid == 0:
    print('I am child process (%s) and my parent is %s.' % (os.getpid(), os.getppid()))
else:
    print('I (%s) just created a child process (%s).' % (os.getpid(), pid))
Process (876) start...
I (876) just created a child process (877).
I am child process (877) and my parent is 876.
如何更改启动方式?
使用set_start_method() 方法,要在创建process进程对象之前,而且在程序中只应该出现一次。
1.2 Process对象的方法
run():执行行动的方法。默认方法是将Process对象构造函数中作为target参数的可调用对象进行调用。
start():启动进程的执行行动,安排对象在各自单独的进程中被调用执行
run()- 进程只能启动一次。如果再次启动会报
AssertionError错误
- 进程只能启动一次。如果再次启动会报
is_alive():返回process对象的存活状态,是布尔值。
join([timeout=None]):如果没有设置timeout时间,执行该方法会锁住进程直到该进程被结束才继续往下执行其他代码。
close():结束process对象,释放所有相关资源。一旦对象被关闭了,该对象的方法和属性都会raise
ValueError.- 当进程仍在运行中时,执行该方法会报错。官方会建议执行
close()前先调用join()或terminate()方法。
- 当进程仍在运行中时,执行该方法会报错。官方会建议执行
1.3 Process对象的属性
name:进程对象的名字。如果没有特别指明,则名字将会按数字排序从
Process-N1到Process-Nk。pid:返回进程的process ID
另外,还有dameon,exitcode,authkey,sentinel属性
1.4 Process对象样例
from multiprocessing import Process

def f(name):
    print('hello', name)

if __name__ == '__main__':
    p = Process(target=f, args=('bob',))
    p.start()
    p.join()
2. 进程池Pool
当需要运行同时运行多个进程的时候,就要使用进程池。进程池是一个装载worker的池子,其中多少个worker代表着可同时执行多少个进程。如果没有定义数量,默认是cpu的核心数(os.cpu_count())。
2.1 如何启动进程池?
process是有context,所以管理进程池最好的方法是使用with()方法,如下例子:
from multiprocessing import Pool

def f(x):
    return x*x

if __name__ == '__main__':
    with Pool(5) as p:
        print(p.map(f, [1, 2, 3]))
- 离开with语句块就会停止运行pool。
- 如果是异步的请求,要在语句块中使用
AsyncResult相关的阻塞方法。
除用with()语句启动之外,亦可以选择手动启动,方法如下:
p = Pool(4)
for i in range(5):
    p.apply_async(func, args=(i,))
print('Waiting for all subprocesses done...')
p.close()
p.join()
同理,p.join()就是进程池的阻塞方法,直到所有结果都返回完毕。
2.2 进程池的方法
apply(func[, args[, kwds]]):会阻塞直到返回结果。
map(func, iterable[, chunksize]:会阻塞直到返回结果。
apply_async(func[, args[, kwds[, callback[, error_callback]]]]):异步请求,返回的是
AsyncResult对象。map_async(func, iterable[, chunksize[, callback[, error_callback]]]):异步请求,返回的是
AsyncResult对象。close():防止更多的任务插入到进程池中。当执行该方法,后续不能再插入任务。
terminate():直接终止worker进程。
join():等待直到所有的worker进程完毕再退出。
- 在使用join()之前一定要调用
close()或terminate()。==这里的操作顺序是与Process对象不一样==。
- 在使用join()之前一定要调用
AsyncResult对象
使用异步就会产生AsyncResult对象,即通过Pool.apply_async()和Pool.map_async()创建的。该对象的详情。对象有以下方法:
get([timeout])堵塞等待结果,当有结果时返回结果。等待timeout时间,如果规定时间内未有返回,则产生
multiprocessing.TimeoutError。wait([timeout])等待timeout秒,或者直到结果可用。
ready()如果调用完毕则返回
True,否则是Falsesuccessful()如果调用完成且没有错误,则返回
True
2.3 进程池样例
from multiprocessing import Pool

def f(x):
    return x*x

if __name__ == '__main__':
    with Pool(processes=4) as pool:         # start 4 worker processes
        result = pool.apply_async(f, (10,)) # evaluate "f(10)" asynchronously in a single process
        print("get:",result.get())  # prints "100" unless your computer is *very* slow
3. 进程间通信
进程间有两种通信方式
Queues:克隆了
queue.Queue类。存入数据put()和获取数据get()。- 在线程和进程中使用均安全
Pipes:是一个连接对,默认是双向传输。创建实例后会返回一个含有两个元素元组变量。
- 每一端都有
send()和recv()方法
- 每一端都有
3.1 Queue样例
from multiprocessing import Process, Queue
import time

def wr(q):
    words = [42, None, 'hello']
    for i in words:
        print("insert to queue:",i)
        q.put(i)
        time.sleep(5)

def rea(q):
    while True:
        print("get from queue:", q.get())

if __name__ == '__main__':
    q = Queue()
    p1 = Process(target=wr, args=(q,))
    p2 = Process(target=rea, args=(q,))
    p1.start()
    p2.start()
    # print(q.get())    # prints "[42, None, 'hello']"
    p1.join()
    if q.empty():
        print("q is empty?",q.empty())
        p2.terminate()
    print("finish")
3.2 Pipe样例
from multiprocessing import Process, Pipe

def f(conn):
    conn.send([42, None, 'hello'])
    conn.close()

if __name__ == '__main__':
    parent_conn, child_conn = Pipe()
    p = Process(target=f, args=(child_conn,))
    p.start()
    print(parent_conn.recv())   # prints "[42, None, 'hello']"
    p.join()
4. 注意事项
- 进程函数的执行语句必须要在
if __name__ == '__main__'中 - 进程和进程池均有
join()和close()方法,他们具体的含义有所不同,所以执行顺序会相反。
三. 多线程Threading
线程是程序最小的执行单元,进程由至少一个线程组成。所以,即使使用多进程的任务模式,每个进程中都至少有一个线程,譬如3个进程就至少会有3个线程。
线程有分主线程和从线程。
前面所提及的线程就是主线程。主线程是当前程序运行所使用的线程,由进程自动创建出来的。每个进程都会有一个主线程。而从线程是指通过thread类手动创建的thread对象。下面所提及的线程绝大多数都是从线程。
Python标准库提供了两个模块:
_threadthreading
_thread是低级模块。threading是高级模块,对_thread进行了封装。绝大多数情况下,我们都是使用threading这个高级模块。
1. threading模块方法
threading.active_count()返回当前存活的Thread对象的数量。实际就是
enumerate()列表的长度。threading.current_thread()返回当前在和控制线程调用方通信的thread对象。如果控制线程调用方不是通过threading模块创建的,则会返回一个被限制功能的仿真thread对象。
threading.excepthook(args, /)处理
Thread.run()方法所产生的未捕获的异常。- 默认情况下,
threading.excepthook()会忽略SystemExit
- 默认情况下,
threading.enumerate()返回当前存活的thread对象列表。该列表包含了守护线程,dummy线程和主线程。不包含被结束的线程和尚未启动的线程。
threading.main_thread()返回主线程对象。
除此之外,还有threading.get_ident(),threading.``get_native_id(),threading.settrace(func),threading.setprofile(func),threading.stack_size([size])方法
2. Thread对象
有两种方法可以指定在从线程调用的函数:
在Thread构造函数中传入可调用对象(不改写
run()方法)给target参数。样式如下:task = threading.Thread(target=download_one, name=i, args=(i,))创建子类覆写
run()方法。样式如下:import threading class CustomerThread(threading.Thread): def __init__(self,**args): super().__init__(**args) def run(self): print("confirm the run method has been overided") try: if self._target: self._target(*self._args, **self._kwargs) finally: del self._target, self._args, self._kwargs task = CustomerThread()
thread对象被创建后 ,必须通过 thread对象的start()方法来启动线程。原因是通过start()方法调用低级模块_thread创建一个新的线程,然后在新线程中调用该对象的run()方法。
2.1 线程对象的方法
run()线程的运行方法。
start()启动线程活动。每个线程都最多只能调用一次。它的作用是调用
run()方法。- 如果调用超过一次,会产生
RuntimeError
- 如果调用超过一次,会产生
join(timeout=None)如果没有设置timeout时间,则会阻塞直到该线程被结束
is_alive()返回该线程的是否存活,是布尔值。
2.2 线程对象的属性
name如果不自定义,会根据构造函数定义默认的线程名
daemon指定该线程是否为守护线程。如果要作为守护线程,必须要在
start()方法调用前设定,否则会报RuntimeError。初始默认值是继承于创建的父线程。主线程不是守护线程,所以通过主线程创建的线程默认值都是False。
2.3 守护线程Daemon thread
线程如果被设置了标志,就可以变成"daemon thread"。该线程的作用是当整个python程序都退出了,该守护线程仍保留。
如何设置该标志?
可以通过daemon属性设置或者在构造函数的daemon参数中设置。
- 主线程只是进程默认启动的第一个线程,它不是守护线程
2.4 全局解释锁
由于CPython解释器有全局解释器锁Global Interpreter Lock(GIL),一次只允许使用一个线程执行 Python 字节码。所以,多线程在Python中只能交替执行,即使100个线程跑在100核CPU上,也只能用到1个核。因此,线程不适合使用在多个 CPU 核心的情况,会造成CPU资源的浪费。
- 这是
CPython解释器的局限,与 Python 语言本身无关。Jython和IronPython没有这种限制。
但是,标准库中所有执行阻塞型 I/O 操作的函数,在等待操作系统返回结果时都会释放 GIL。这意味着在 Python 语言这个层次上可以使用多线程。一个 Python 线程等待网络响应时,阻塞型 I/O 函数会释放 GIL,再运行一个线程。所以,如果是运行I/O密集型任务,线程仍然是合适的模型。
2.5 线程数据独立
在多线程模式下,每个线程都会有自己的数据。如果线程有多个函数都是用同一个变量,传参时会很麻烦。threading模块中为了简化数据操作,引入local概念,即创建一个实例用来管理数据,每个线程互相独立。
- 可以理解为是一个字典类型的全局变量。该字典的键是每个线程的名字,值则是另外一个字典,存储每个变量和值。
创建方法:
mydata = threading.local()
在某个线程中存储值
mydata.grade = A
在该线程中读取值
current_thread_grade = mydata.grade
2.6 样例
该例子是摘自《流畅的python》书中示例18-1,改写了主线程运行的函数,并在程序增加两个方法说明主线程和从线程。
import threading
import itertools
import time
import sys
class Signal:
    go = True

def spin(msg, signal):
    write, flush = sys.stdout.write, sys.stdout.flush
    for char in itertools.cycle('|/-\\'):
        status = char + ' ' + msg
        write(status)
        flush()
        write('\x08' * len(status))
        time.sleep(.2)
        if not signal.go:
            break
    write(' ' * len(status) + '\x08' * len(status))

def slow_function():
    # 假装等待I/O一段时间
    print("in slow_function")
    x = 0
    count = 0
    while True:
        x = x ^ 1
        count += 1
        if count > 100000000:
            break
    return 42

def supervisor():
    signal = Signal()
    spinner = threading.Thread(target=spin, args=('thinking!', signal))
    print("当前线程数:",threading.enumerate())       ## 1
    print('spinner object:', spinner)
    spinner.start()
    print("当前线程数:",threading.enumerate())       ## 2
    print("begin")
    result = slow_function()
    signal.go = False
    spinner.join()
    return result

def main():
    result = supervisor()
    print('Answer:', result)

if __name__ == '__main__':
    main()
分析:
- 第一个查询“当前线程数”时,虽然该语句前面已经创建了spinner对象,但由于尚未执行该线程,所以得到的结果是
当前线程数: [<_MainThread(MainThread, started 15476)>]。 - 到了第二个查询“当前线程数”,前面已执行了
start(),代表已启动了从线程。所以得到的结果是当前线程数: [<_MainThread(MainThread, started 15476)>, <Thread(Thread-1, started 3888)>]。 - 主线程的while循环是想模拟耗时计算,同时从线程也在
stdout。当主线程运行的slow_function()跳出函数,继续执行signal.go = False,让从线程也跳出循环。最后通过spinner.join()关闭从线程。
3. Lock对象
除了全局解释锁之外,在线程中还有一种锁叫primitive lock,其作用是用来线程同步,即当A线程在执行某些操作时,B线程如想要执行同样的操作会进行阻塞等待,直到线程A释放后B才会执行。
primitive lock有两个状态:
- locked
- unlocked(创建后的默认状态)
primitive lock锁并不属于任何一个线程,可以理解为一个公共变量。如果想要参与到该规则中,则参加的线程都要在函数体中使用acquire()和release()两种方法(一旦有线程不遵守该规则将会打破该平衡)。
primitive lock有两个基本方法:
acquire()查询锁状态,如锁是locked状态,则同步堵塞;如锁是unlocked状态,则为其上锁。
release()解锁
当锁是unlocked状态时,执行acquire()方法会直接将锁状态改为locked。
当锁是locked状态时,执行acquire()方法时会进行阻塞,直到其他线程使用release()方法解锁。当多个线程都执行lock.acquire()时,只有一个线程能成功地获取锁,然后继续执行代码,其他线程就继续等待直到获得锁为止。
3.1 Lock对象如何使用?
通过Lock()创建对象
import threading

lock = threading.Lock()
然后在线程的函数体中使用with()语句或者try...finally语句实现
with some_lock:
    # do something...

or

some_lock.acquire()
try:
    # do something...
finally:
    some_lock.release()
- 由于
Lock()类已定义了enter和exit的方法,所以用with会比较简单。
3.2 如何查询lock对象状态?
lock对象提供了locked()方法可以查询
>>> lock = threading.Lock()
>>> print(lock.locked())
False
4. RLock对象
在Lock对象的基础上增加以下内容:
- 解锁状态的锁是没有拥有者,上锁时会把锁的拥有者指定给上锁者。
- 给锁增加了计数属性。能够给锁上锁N次,但同时需要给锁解锁N次才能完全释放。
acquire()/release()的调用是成对出现,当count=0的时候才能完全释放。
RLock对象没有了locked()查看锁的状态,但是可以通过直接访问该锁获取状态。
>>> threadLock = threading.RLock()
>>> print(threadLock)
<unlocked _thread.RLock object owner=0 count=0 at 0x000002EF994E65F8>
5. 如何运行多线程
如果在不考虑数据互锁的情况下,一般按照具体要跑的任务数量尽量多开线程(但不是越多越好,需要根据项目调试)。
import threading
import time

TEST_LIST = ['CN', 'IN', 'US', 'ID', 'BR', 'PK', 'NG', 'BD', 'RU', 'JP', 'MX', 'PH', 'VN', 'ET', 'EG', 'DE', 'IR', 'TR', 'CD', 'FR']


def thread_function(name):
    print('thread %s is running...' % threading.current_thread())

if __name__ == "__main__":

    threads = list()
    for index in TEST_LIST:
        x = threading.Thread(target=thread_function, args=(index,))
        threads.append(x)
        x.start()

    for index, thread in enumerate(threads):
        thread.join()
如上面的代码所示,总共开启了20个从线程执行任务。
thread <Thread(Thread-1, started 20756)> is running...
thread <Thread(Thread-2, started 22472)> is running...
thread <Thread(Thread-3, started 6232)> is running...
thread <Thread(Thread-4, started 16360)> is running...
thread <Thread(Thread-5, started 21324)> is running...
thread <Thread(Thread-6, started 20692)> is running...
thread <Thread(Thread-7, started 17872)> is running...
thread <Thread(Thread-8, started 14424)> is running...
thread <Thread(Thread-9, started 21136)> is running...
thread <Thread(Thread-10, started 21084)> is running...
thread <Thread(Thread-11, started 19056)> is running...
thread <Thread(Thread-12, started 15204)> is running...
thread <Thread(Thread-13, started 436)> is running...
thread <Thread(Thread-14, started 22420)> is running...
thread <Thread(Thread-15, started 6520)> is running...
thread <Thread(Thread-16, started 2204)> is running...
thread <Thread(Thread-17, started 20424)> is running...
thread <Thread(Thread-18, started 20068)> is running...
thread <Thread(Thread-19, started 14532)> is running...
thread <Thread(Thread-20, started 21792)> is running...
注意点:
thread.start()和thread.join()不要写在同一个循环内。因为thread.join()的作用是堵塞线程直到当前线程结束。如果放在同一个循环内,其实就等于用一个线程执行所有任务,只是每次都会启动一个新线程而已。而实际上,我们是想要一次开启若干个线程,然后堵塞已加载任务的线程让其执行完当前任务就结束。采取上面例子的代码就能实现该目的。
四. 多进程与多线程的选择
选择使用多进程还是多线程,有个关键的指标是看任务类型
- 计算密集型
- IO密集型
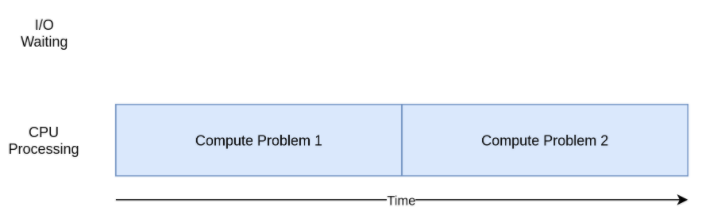
计算密集型CPU bound
计算密集型就是受限于CPU的任务。其特点是要进行大量的计算,消耗CPU资源,比如计算圆周率、对视频进行高清解码等等,全靠CPU的运算能力。现代的CPU通常有多个核心(可以理解为是多个小型的单核CPU集成),所以跑满所有核心是最高效的利用。任务数量不是越多越好,一般来说,计算密集型任务同时进行的数量应当等于CPU的核心数。
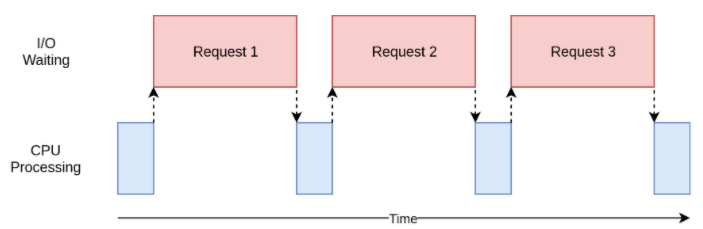
I/O密集型I/O bound
IO密集型就是涉及到网络、磁盘等一切IO的任务。其特点是CPU消耗很少,任务的大部分时间都在等待IO操作完成(因为IO的速度远远低于CPU和内存的速度)。对于IO密集型任务,任务越多,CPU效率越高,任务上限就是满载CPU核心。常见的大部分任务都是IO密集型任务,比如Web应用。
五. 异步I/O
python在3.4版本引入了asyncio包,这个包使用事件循环驱动的协程实现异步I/O的并发。
asyncio特点:
- 单线程概念(python后续版本可扩展成多线程)
- 在线程里启动一个事件循环(event loop),时刻监听新的循环事件,并加以处理,直到异步任务结束。期间允许异步任务交出执行权给其他任务,等到其他任务完成,再收回执行权继续往下执行。
- 是一个调用
async/await语法的库,是异步框架的基础。
此外,asyncio提供了两种层级的API:
- 高级:应用开发者首选(着重学习)
- 低级:适用于模块、框架等需要完全控制event loop行为的开发者。
Low-level APIs
底层的异步调用框架包括以下部分:
Event Loop,Futures,Transports and Protocols,Policies,Platform Support
以下的学习内容主要是event loop 和Future。
1 Event loop
event loop是asyncio应用的核心。所有的异步任务,回调,IO操作,子进程都是在这里面运行。
1.1 获取Event loop对象
首先,我们要获取一个event loop对象,通常使用以下方法获取:
asyncio.get_event_loop():获取当前的event loop。如果当前线程是主线程,且没有event loop,asyncio会创建一个新的event loop,并将它设置称为当前的event loop。
所以,执行该方法会确保一定会获取到event loop对象。
上面提及到的创建和设置的方法分别是:
asyncio.new_event_loop()asyncio.set_event_loop(loop)
由于函数不确定性和应用情况复杂,当使用协程或回调时,官方会推荐使用另一个获取方法:
asyncio.get_running_loop():返回一个正在运行的event loop。该方法的关键点是正在运行。如果没有正在运行的event loop,则会报
RuntimeError错误。
1.2 Event loop方法
当获取了该对象后,在low-level中有很多方法。按照类型可分:
查看状态:
loop.is_running()如果event loop正在运行则返回True
loop.is_closed()如果event loop关闭了则返回True
loop.time()返回eventloop内部的当前时间。
运行、停止:采用堵塞的方式
loop.run_until_complete(future)运行直到future实例返回结果
loop.run_forever()一直运行直到调用
stop()方法才会停止。如果执行
run_forever()之前就调用stop(),eventloop会调用所有被调度的任务响应I/O事件,然后退出(==不太明白==)。如果执行
run_forever()之后调用stop(),eventloop会继续调用已在运行的任务(已调度但并未调用的任务不会运行,会再下次run_forever()或run_until_complete()再调用),然后再退出。loop.stop()停止event loop
loop.close()关闭event loop。
正确的使用方法:当确认loop已运行完毕再运行。
如果调用该方法时loop仍在运行,仍在排队的回调函数将会被丢弃。
调度回调
call_soon(callback, *args, context=None)调度已经注册的回调在下一次eventloop的迭代携带
args参数调用。每个已注册的回调只能被调用一次。所以,执行该方法只是将某个回调放到前面去执行。
不是线程安全
call_soon_threadsafe(callback, *args, context=None)和
call_soon()一样,不同点是必须将回调放到别的线程去执行。
除了能够提前,eventloop也支持将回调延时到某个时间节点再执行。
call_later(delay, callback, *args, context=None)调度经过给定的延时再执行回调。延时时间可以精确到浮点数。
call_at(when, callback, *args, context=None)调度回调在某个时间节点执行。
when参数是一个timestamp。
创建Futures和Tasks
loop.create_future()在该loop创建一个Future对象
loop.create_task(coro, *, name=None)返回一个Task对象
开启网络连接
...
创建网络服务器
...
...
2. Future类
future对象用于将低级模块的回调代码与高级模块的async/await代码桥接。
2.1 future对象
Future对象表示异步操作的结果。它不是线程安全。关于使用future对象,有以下要注意:
- 不应该在用户操作的api中暴露future对象
- future对象要通过
loop.create_future()方法创建
2.1.1 future对象方法
result()返回future对象结果值或exception。
如果future对象已完成且经过
set_exception()设置了exception,则会产生该exception错误。如果future对象被取消,则产生
CancelledError错误如果future对象还没可用,则产生
InvalidStateError错误set_result(result)标记future对象已完成,并赋值给该对象。如果该对象已完成,会产生
InvalidStateError错误。set_exception(exception)标记future对象已完成,并赋exception给该对象。如果该对象已完成,会产生
InvalidStateError错误。done()如果对象已完成则返回
True。已完成的状态包括了该对象被取消,或者经过
set_result和set_exception的调用。cancelled()如果对象已被取消则返回
True该方法通常是用在调用
set_result和set_exception之前,判断future对象是否被取消。cancel(msg=None)取消future对象,并执行回调。
如果future对象已经完成或已被取消,则返回
False,代表取消失败。否则会将future对象状态变成已取消,调用回调函数,并返回True。add_done_callback(callback, ***, context=None)当future对象完成后执行回调函数。回调函数被调用的时候只能把future对象作为唯一的参数。
remove_done_callback(callback)从回调列表中移除该回调函数。移除成功后,返回值通常会是1,代表只移除了一个。如果不是1,则代表该回调函数添加了若干次。
exception()返回该future对象被设置的exception。
get_loop()返回该future对象所绑定的loop
High-level APIs
在高级模块中,底层的代码已经被封装或大大简化,主要可以实现以下:
- 使用协程和任务来执行异步I/O的并发
- 执行网络IO和IPC
- 控制子进程
- 通过队列的形式分布式任务
- 同步并发的代码
在高级模块中的API迭代中,从3.8版本开始弃用loop参数,改由底层模块直接管理loop。目的是减少人为操作,从而减少冗余和未知错误的可能性。如该包的介绍,高级模块是应用开发者的首选。
虽然协程是asyncio的核心,但在高级模块中,所有的协程对象都会经过task的包装,然后才被放到event loop中。
1. Coroutines和Tasks
官方推荐使用async/await语法的协程编写异步应用
使用async/await语法的样例:
import asyncio

async def main():
    print('hello')
    await asyncio.sleep(1)
    print('world')

asyncio.run(main())
在旧版本,通常是用
@asyncio装饰器加yield from来表示协程,如下:@asyncio.coroutine def old_style_coroutine(): yield from asyncio.sleep(1)这种使用方法将会被弃用!所以还是用回官方推荐的方法
async + await
1.1 什么是coroutine协程?
协程是至能够在若干个不同断点进入、退出、恢复的子程序。在python的文档中,coroutine协程包含了两层含义:
- 协程函数:使用async def定义的函数,该函数会变成协程函数。
- 协程对象:通过调用协程函数所返回协程对象
这里的调用指的是直接调用。譬如
main是协程函数,则main()就是协程对象。如果直接执行前面所定义的main(),会返回<coroutine object main at 0x000002323B43B3C8>
1.2 如何执行协程
直接调用协程函数并不会执行函数体内的代码,一定要通过asyncio的调用方式来执行。asyncio提供3种机制来执行协程:
- 使用
asyncio.run()执行最顶端的协程入口函数(上述例子的main()就是程序的入口协程对象) - 使用
asyncio.create_task()创建asyncio任务,将协程(不是协程函数)加入到event loop中。 await表达式后面的协程(或任务)
- 是否能用await看下面介绍的awaitable对象
- 如果在协程函数中执行其他协程函数,是通过
await来执行。
高级模块下如何启动异步程序?
最顶层(或者说是入口)必须通过asyncio.run()来启动event loop。所以asyncio.run()就是高级模块中的启动函数。
asyncio.run(coro, ***, debug=False)会管理asyncio的event loop,完成后关闭线程池。
- 如果异步的event loop已在同一个线程运行中,该函数是无法被调用
1.3 什么是Awaitable对象?
定义:如果一个对象能够用在await表达式,那该对象就是awaitable对象。
符合的对象有:
- 协程Coroutine: 调用协程函数所返回的协程对象
- 任务Task: Future 的子类,用于包装协程
- 期货Future: 调度执行某物的结果。是底级模块中特别的awaitable对象。
- 在高级模块中,一般不会直接接触到该对象,也不需要创建该对象。
1.4 Task对象
是一个运行协程的Future子类的对象(继承Future,所以不是线程安全)。它继承了除Future.set_result()和Future.set_exception()之外的Future的所有属性和方法。
Task对象不是手动实例化,而是通过把协程传给create_task(...)方法后返回一个task对象。
1.4.1 task对象的方法
cancel(msg=None)请求任务删除。会产生
CancelledError错误,可通过try...except..语句捕捉。- 不像
Future.cancel(),Task.cancel()不能保证任务会被删除。
- 不像
cancelled()如果被删除则返回
Truedone()如果任务完成则返回
Trueresult()返回任务的结果。
- 如果任务完成,该结果是协程的返回结果。
- 如果任务状态是被删除,则产生
CancelledError错误 - 如果任务状态是尚未完成,则产生
InvalidStateError错误
add_done_callback(callback, *, context=None)当任务完成后,执行回调函数
- 该方法应该只用在低级模块中
remove_done_callback(callback)从回调列表中移除该回调
- 该方法应该只用在低级模块中
此外,还有get_coro(),get_name(),set_name()等方法
1.4.2 运行任务
如果只是创建单个任务,使用create_task()的方法;
如果需要多个任务,可以按照创建单个任务的方法逐一创建多个create_task()。亦或者通过gather()方法一次创建N个并发的任务。
单个任务
asyncio.create_task(coro, *, name=None)将协程加入到任务中,返回Task对象,并调度任务中的协程执行。
- 如果创建任务命名了名字,即
name不是None,会通过Task.set_name()命名该任务。 - 该函数可使用低级模块中
asyncio.ensure_future()代替。 - 任务一般要配合
await。因为如果任务中有asyncio.sleep()跳出当前任务,而主程序协程不堵塞继续执行的话,最后就会结束程序,而任务断点之后的代码也不会被执行。
- 如果创建任务命名了名字,即
样例:
import asyncio

async def nested():
    return 42

async def main():
    # Schedule nested() to run soon concurrently
    # with "main()".
    task = asyncio.create_task(nested())

    # "task" can now be used to cancel "nested()", or
    # can simply be awaited to wait until it is complete:
    await task

asyncio.run(main())
并发任务
await asyncio.gather(*aws, loop=None, return_exceptions=False)并发执行可awaitable对象序列。如果awaitable对象是协程,会自动先将其转成Task对象。
- 如果所有的任务都成功完成,返回的结果是一个含有所有任务返回值的列表。
- 该函数可使用低级模块中
asyncio.ensure_future()代替。 - 如果
gather()被cancelled,所有提交的对象(不包括已完成的)也将会被删除。
样例:
import asyncio

async def factorial(name, number):
    f = 1
    for i in range(2, number + 1):
        print(f"Task {name}: Compute factorial({i})...")
        await asyncio.sleep(1)
        f *= i
    print(f"Task {name}: factorial({number}) = {f}")

async def main():
    # Schedule three calls *concurrently*:
    await asyncio.gather(
        factorial("A", 2),
        factorial("B", 3),
        factorial("C", 4),
    )

asyncio.run(main())
1.4.3 查看任务
asyncio.current_task(loop=None)返回当前正在运行的task对象。如果没有正在运行的task,则返回
None。asyncio.all_tasks(loop=None)返回loop中尚未完成的所有task对象,包括在外层的入口协程对象。
- 不要将
all_tasks()和as_completed()结合一起适用,会造成死循环。
- 不要将
1.5 协程的其他方法
1.5.1 异步延时
在同步程序中使用time.sleep()进行阻塞延时操作,但在异步的程序中实现该需求则需要将其替换为asyncyio.sleep()。
asyncio.sleep(delay, result=None, ***, loop=None)挂起当前任务,转而执行其他任务,N秒(以秒为计数单位)后回到所挂起任务的断点接着执行该任务后续代码。实际延时时间是
N ≤ x <∞(具体原因看下面)。如果提供了result参数,延时操作完成后会返回该预设值给调用该函数的调用者。
当一个loop中有若干个任务,假如其中有个任务没有使用ascyncio.sleep(),则当线程执行到那个任务时,就必须等其函数体执行完跳出后才能执行其他任务。如果不幸该任务是需要消耗很多时间才能完成任务,会堵塞其他任务的执行,宏观来看整个程序就被堵塞了。
所以,要想发挥异步的最大效能就得处处异步,而且要预先设想哪里会是潜在的堵塞。
从上面的解释中,可以看出异步延时有个重要的作用:交出控制权,将其交还给调度程序。
样例:
import asyncio
import datetime

async def display_date():
    loop = asyncio.get_running_loop()
    end_time = loop.time() + 5.0
    while True:
        print(datetime.datetime.now())
        if (loop.time() + 1.0) >= end_time:
            break
        back = await asyncio.sleep(1,result="back to display")
        print(back)

asyncio.run(display_date())
1.5.2 等待结果返回
由于任务的执行是需要时间,而我们并不知道确切的时间。为了更好的把握程序的整体执行,关于获取等待结果的方式会有以下几种:
- 超时等待时间
wait_for() - 条件等待
wait() - 优先返回等待
as_completed()
超时等待
coroutine asyncio.wait_for(aw, timeout, *, loop=None)如果传入的是协程函数,则自动将其转换成task对象。
如果调用的任务在规定时间内没完成,则产生超时错误
asyncio.TimeoutError如果timeout是
None,则和await没区别,会堵塞直到任务完成。
样例:
async def eternity():
    # Sleep for one hour
    await asyncio.sleep(3600)
    print('yay!')

async def main():
    # Wait for at most 1 second
    try:
        await asyncio.wait_for(eternity(), timeout=1.0)
    except asyncio.TimeoutError:
        print('timeout!')

asyncio.run(main())
条件等待
coroutine asyncio.wait(aws, *, loop=None, timeout=None, return_when=ALL_COMPLETED)并发执行awaitable可迭代对象(譬如列表,字典,集合等),直到达到
return_when的结束条件。返回两个set
(done, pending),里面是Task/Future对象。虽然
wait()也有timeout参数,但不像wait_for(),当timeout时候不会取消futurereturn_when设置返回条件:Constant Description FIRST_COMPLETEDThe function will return when any future finishes or is cancelled. FIRST_EXCEPTIONThe function will return when any future finishes by raising an exception. If no future raises an exception then it is equivalent to ALL_COMPLETED.ALL_COMPLETEDThe function will return when all futures finish or are cancelled. 官方不建议将协程作为参数传入到可迭代对象中!
虽然现阶段可以传入,官方将会在3.11版本弃用传入协程的方式。
当传入的是协程对象时,wait()会自动将其转换成Tasks对象,且在返回的sets中显示的是Task对象而不是协程对象。这导致了在done或pending集合中无法找到协程对象的完成结果。
官方的样例:
# Example 1

async def foo():
    return 42

coro = foo()
done, pending = await asyncio.wait({coro})

if coro in done:
    # This branch will never be run!
# Example 2

async def foo():
    return 42

task = asyncio.create_task(foo())
done, pending = await asyncio.wait({task})

if task in done:
    # Everything will work as expected now.
分析:
- 从第一个例子得出,
if coro in done语句永远不会执行,原因就是之前所提到的协程对象在内部被自动转成Task对象,协程对象不会出现在set的结果中。
优先返回等待
coroutine asyncio.as_completed(aws, *, loop=None, timeout=None)并发执行awaitable可迭代对象(譬如列表,字典,集合等),会按照任务完成时间返回协程对象。即第一个任务执行,并不意味着它是第一个返回。
可以设置超时时间,如果到时间还有结果未能返回,就产生
asyncio.TimeoutError错误。一般使用
for循环输出所有任务。- 要使用
await
- 要使用
样例:
task1 = asyncio.create_task(foo("hello"))
task2 = asyncio.create_task(foo("world"))
task3 = asyncio.create_task(foo("test"))

for i in asyncio.as_completed({task1,task2,task3}):
    result = await i
    print(result)
2. Queue
asyncio的queue是仿照queue模块设计的,能够用在async/await语句中。
不是线程安全
Queue是FIFO,下面介绍其他变种的Queue类。
首先,需要先实例化Queue类,创建Queue对象。该类可传入参数maxsize,默认值是0。
queue = asyncio.Queue()
2.1 类属性
maxsize:queue的容量当该值小于或等于0时,代表容量是无限多。在有限容量的情况下,如果queue已装满,当使用
await put时会一直被堵塞,直到使用get()提取项目令其queue有了空位才能装入。
2.2 类方法
判断
empty():检测队列是否为空,如空则返回True。full():检测队列是否已满,如满则返回True。
存取项目
get():从队列拿出一个项目并返回,如果队列为空则会异步等待。需要结合
await表达式使用get_nowwait():如果项目立即可用则返回该项目,否则则报QueueEmpty错误不要与
await表达式一起使用put():存储一个项目到队列,如果队列已满则会异步等待,直到存储成功。put_nowait():存储一个项目到队列,如果队列已满则报QueueFull错误。
关于队列
qsize():返回在队列中的项目数量join():堵塞,并直到队列中的项目都已经完成。一定要结合task_done()使用。当计数器为0时,则解除堵塞。有未完成任务增加到队列时,计数器加1;当项目被提取并完成后调用
task_done(),计数器减1。task_done():由队列调用者调用,告诉queue当前get()出来的任务已处理完成。
2.3 其他相关类
以下类只是在类Queue的基础上增加其他特性,上面所介绍的属性和方法是通用的。
2.3.1 Priority Queue
队列可以为项目设置优先级,实例是tuple格式(priority_number, data)。
数字越低优先级越高
2.3.2 LIFO Queue
与普通的Queue不同,这种Queue是后进先出。
2.4 样例
以下是官方文档的示例
import asyncio
import random
import time


async def worker(name, queue):
    while True:
        # Get a "work item" out of the queue.
        sleep_for = await queue.get()

        # Sleep for the "sleep_for" seconds.
        await asyncio.sleep(sleep_for)

        # Notify the queue that the "work item" has been processed.
        queue.task_done()

        print(f'{name} has slept for {sleep_for:.2f} seconds')


async def main():
    # Create a queue that we will use to store our "workload".
    queue = asyncio.Queue()

    # Generate random timings and put them into the queue.
    total_sleep_time = 0
    for _ in range(20):
        sleep_for = random.uniform(0.05, 1.0)
        total_sleep_time += sleep_for
        queue.put_nowait(sleep_for)

    # Create three worker tasks to process the queue concurrently.
    tasks = []
    for i in range(3):
        task = asyncio.create_task(worker(f'worker-{i}', queue))
        tasks.append(task)

    # Wait until the queue is fully processed.
    started_at = time.monotonic()
    await queue.join()
    total_slept_for = time.monotonic() - started_at

    # Cancel our worker tasks.
    for task in tasks:
        task.cancel()
    # Wait until all worker tasks are cancelled.
    await asyncio.gather(*tasks, return_exceptions=True)

    print('====')
    print(f'3 workers slept in parallel for {total_slept_for:.2f} seconds')
    print(f'total expected sleep time: {total_sleep_time:.2f} seconds')


asyncio.run(main())
分析:
- 首先创建queue实例,在创建时没有限制队列容量,所以理论上可以存储无限个项目。
- 使用
put_nowait()往队列添加项目,总共20个。注意这里并没有使用await表达式。 - 创建3个任务对象来执行队列中的项目。这里另外创建了个数组
tasks是为了在后面可以取消这些任务的执行。 - 在
async def worker协程里,使用queue.get()提取队列中的项目。注意这里使用await表达式。当任务完成,就执行queue.task_done()(这里的任务就只是异步延时N秒)。 - 使用
await queue.join()进行堵塞直到队列中的项目全部完成。 - 当队列任务都完成后,由于worker是使用
while True循环语句,所以需要通过外部进行停止(如果只是单独一个程序,直接结束掉任务或许没关系,但如果是复合项目或者还需要运行其他异步程序,一定要停止当前这些任务。)这时候就可以使用前面提到的tasks数组停止任务。
3. 数据流Streams
作用于网络连接,可以不需要通过调用底层协议和传输就能完成发送和接收数据的操作。
涉及到两个类:StreamReader和StreamWriter
要明确的是,官方是不建议手动直接创建这两个类的对象,而是应该通过open_connection()和start_server()方法来创建。
下面先介绍这两个类所代表的含义:
3.1 StreamReader类
提供api使其能读取I/O流数据。
方法:
read(n=-1):读取n个字节。如果不设定n,默认值是-1,会读取到EOF才停止并返回所有的字节。readline():读取一行字节,行的结束符是\n或EOF。readexactly(n):读取指定数量的字节。如果读取到EOF而还没到指定数量的字节数时,会产生IncompleteReadError错误。readuntil(separator=b'\n'):从某个指定字符开始读取字节。之前所存放在内部缓冲区的数据会被移除。at_eof():如果缓冲区为空而且feed_eof()已被调用,则返回True
3.2 StreamWriter类
提供api使其能写入I/O流数据。
方法:
write(data):尝试往套接字直接写入数据。如果失败,则会保存到写入缓存中,直到能够写入。应该搭配
drain()方法一起使用。writelines(data):尝试往套接字直接写入一行数据。如果失败,则会保存到写入缓存中,直到能够写入。同样,应该搭配
drain()方法一起使用。close():停止套接字和数据流应该要与
wait_closed()一起使用。can_write_eof():如果支持write_eof()方法,则返回Truewrite_eof():当写入缓冲被刷新后,停止写入。transport:返回传输协议get_extra_info(name, default=None):获取额外的传输协议信息drain():当写入缓冲满时堵塞,直到缓冲降到指定值,然后恢复写入操作。is_closing():如数据流或进程已被关闭或正在关闭,则返回Truewait_closed():堵塞直到数据流被关闭。
3.3 Streams方法
open_connection(host=None, port=None, *, loop=None, limit=None, ssl=None, family=0, proto=0, flags=0, sock=None, local_addr=None, server_hostname=None, ssl_handshake_timeout=None):创建网络连接,返回一对元组对象(reader, writer)。limit参数决定返回给StreamReader缓冲区域的大小。默认是64KB。该方法一般是用在客户端。
start_server(client_connected_cb, host=None, port=None, ***, loop=None, limit=None, family=socket.AF_UNSPEC, flags=socket.AI_PASSIVE, sock=None, backlog=100, ssl=None, reuse_address=None, reuse_port=None, ssl_handshake_timeout=None, start_serving=True):启动一个socket服务器。当建立了一个客户端连接,会调用
client_connected_cb函数。该函数要使用reade和writer作为参数(分别是StreamReader,StreamWriter的实例)。client_connected_cb可以是普通函数或者是协程函数。如果是协程函数,则会自动调度为Task。
在asyncio包中,针对Unix核心还延伸了上述两个方法,分别是open_unix_connection()和start_unix_server()。用法之前的一样,主要使用在Unix套接字。
3.4 样例
以下样例来自官网
服务端
import asyncio

async def handle_echo(reader, writer):
    data = await reader.read(100)
    message = data.decode()
    addr = writer.get_extra_info('peername')

    print(f"Received {message!r} from {addr!r}")

    print(f"Send: {message!r}")
    writer.write(data)
    await writer.drain()

    print("Close the connection")
    writer.close()

async def main():
    server = await asyncio.start_server(
        handle_echo, '127.0.0.1', 8888)

    addr = server.sockets[0].getsockname()
    print(f'Serving on {addr}')

    async with server:
        await server.serve_forever()

asyncio.run(main())
客户端
import asyncio

async def tcp_echo_client(message):
    reader, writer = await asyncio.open_connection(
        '127.0.0.1', 8888)

    print(f'Send: {message!r}')
    writer.write(message.encode())

    data = await reader.read(100)
    print(f'Received: {data.decode()!r}')

    print('Close the connection')
    writer.close()

asyncio.run(tcp_echo_client('Hello World!'))
3.5 应用场景
待补充
注意事项
- 默认情况下asyncio是运行在生产模式。如果想要进入调试模式,可使用以下方式开启
- Setting the
PYTHONASYNCIODEBUGenvironment variable to1. - Using the Python Development Mode.
- Passing
debug=Truetoasyncio.run(). - Calling
loop.set_debug().
- Setting the
- python3.9版本以上异步可以使用
to_thread(func)在另外单独线程直接运行函数(不是协程函数)
六. concurrent.futures模块
该模块提供了异步调用的高级接口,ProcessPoolExecutor和 ThreadPoolExecutor类都实现了通用的 Executor接口。因此使用 concurrent.futures 模块能特别轻松地把基于线程的方案转成基于进程的方案。
此外,该模块中还有一个很重要的东西:Future对象。
Future对象是concurrent.futures模块和asyncio包的重要组件,在python标准库中有两个名为Future 的类:concurrent.futures.Future 和 asyncio.Future。这两个 Future 类的实例都表示可能已经完成或者尚未完成的延迟计算。
1. Executor对象
是一个提供异步调用的抽象类。一般不直接使用,而是应该通过它的子类ProcessPoolExecutor和 ThreadPoolExecutor类来调用。
方法:
submit(fn, /, *args, **kwargs)安排可调用的函数执行,并返回一个Future对象。
map(func, *iterables, timeout=None, chunksize=1)与python的高阶函数
map()相似,是作用整个可迭代对象。相比于python高阶函数map()的惰性反应,这个会立即使用并发的方式执行作用所有的可迭代对象。返回的是一个迭代器。关于
chunksize参数,ThreadPoolExecutor是没有效果。但ProcessPoolExecutor应该按照可迭代对象的数量调节(总比默认的1好)。shutdown(wait=True, ***, cancel_futures=False)发送信号给执行器告诉等future执行完毕后会释放所有正在使用的资源。在
shutdown()之后调用submit()或map()会产生RuntimeError错误。
2. ThreadPoolExecutor
使用线程池进行异步调用。是Executor的子类。
使用方法
concurrent.futures.ThreadPoolExecutor(max_workers=None, thread_name_prefix='', initializer=None, initargs=())在3.8版本之前,如果
max_workers没有提供或者是None,则默认是运行机器的进程数再乘以5(如果进程数是4,则max_workers就是20)。在3.8版本是min(32, os.cpu_count() + 4),即最小是5,最多是32个线程。
使用样例
import concurrent.futures
import urllib.request

URLS = ['http://www.foxnews.com/',
        'http://www.cnn.com/',
        'http://europe.wsj.com/',
        'http://www.bbc.co.uk/',
        'http://some-made-up-domain.com/']

# Retrieve a single page and report the URL and contents
def load_url(url, timeout):
    with urllib.request.urlopen(url, timeout=timeout) as conn:
        return conn.read()

# We can use a with statement to ensure threads are cleaned up promptly
with concurrent.futures.ThreadPoolExecutor(max_workers=5) as executor:
    # Start the load operations and mark each future with its URL
    future_to_url = {executor.submit(load_url, url, 60): url for url in URLS}
    for future in concurrent.futures.as_completed(future_to_url):
        url = future_to_url[future]
        try:
            data = future.result()
        except Exception as exc:
            print('%r generated an exception: %s' % (url, exc))
        else:
            print('%r page is %d bytes' % (url, len(data)))
3. ProcessPoolExecutor
使用进程池进行异步调用。是Executor的子类。核心是使用multiprocessing的模块实现。
使用方法
concurrent.futures.ProcessPoolExecutor(max_workers=None, mp_context=None, initializer=None, initargs=())如果
max_workers没有提供或者是None,则默认是运行机器的进程数。windows下最多不能大于61。
使用样例
import concurrent.futures
import math

PRIMES = [
    112272535095293,
    112582705942171,
    112272535095293,
    115280095190773,
    115797848077099,
    1099726899285419]

def is_prime(n):
    if n < 2:
        return False
    if n == 2:
        return True
    if n % 2 == 0:
        return False

    sqrt_n = int(math.floor(math.sqrt(n)))
    for i in range(3, sqrt_n + 1, 2):
        if n % i == 0:
            return False
    return True

def main():
    with concurrent.futures.ProcessPoolExecutor() as executor:
        for number, prime in zip(PRIMES, executor.map(is_prime, PRIMES)):
            print('%d is prime: %s' % (number, prime))

if __name__ == '__main__':
    main()
4. Future对象
如之前所述,Future实例是通过Executor.submit()创建的。
通常情况下不应该手动创建期物,而只应该由并发框架(concurrent.futures 或 asyncio)实例化:我们传入可调用的对象,框架会将它进行排期,并返回一个Future期货。
cancel()尝试取消调用。如果调用正在被执行或者已经完成,则无法被取消,则返回
False。如果调用将被取消,则返回True.cancelled()如果取消成功则返回
True。running()如果调用正在执行,则返回
True。done()如果调用成功取消或已完成执行,则返回
True。result(timeout=None)返回执行的结果。如果尚未完成,则会堵塞长度为timeout的时间。如果timeout结束了还未完成,则产生
concurrent.futures.TimeoutError.timeout可以是int或float格式。如果timeout没有设定,则会一直等待。
exception(timeout=None)返回调用产生的错误。
add_done_callback(fn)给该期货增加一个回调函数。当future被取消或者完成调用后,future对象被成为该回调函数的唯一参数,并执行该回调函数。
5. 模块方法
该模块提供了两个方法
concurrent.futures.wait(fs, timeout=None, return_when=ALL_COMPLETED)传入futures(列表、集合、字典均可),等待Future们实例完成后会返回一个含有两个集合的tuple,分别是(done=set{}, not_done=set{})。
done集合包含已完成会被取消的futures;not_done集合包含的是等待或正在运行的futures。
另外,通过
return_when参数可以设置返回集合的时间Constant Description FIRST_COMPLETEDThe function will return when any future finishes or is cancelled. FIRST_EXCEPTIONThe function will return when any future finishes by raising an exception. If no future raises an exception then it is equivalent to ALL_COMPLETED.ALL_COMPLETEDThe function will return when all futures finish or are cancelled. concurrent.futures.as_completed(fs, timeout=None)传入futures(列表、集合、字典均可),返回一个futures实例的迭代器。在
as_completed()被调用前完成的会按照完成的时间顺序产出。由于迭代器的限制,每一个实例结果只能被返回一次。
如果设置了timeout,如果在timeout之后仍有future未完成的,会弹出
concurrent.futures.TimeoutError错误,并指明多少个尚未完成。
样例
使用wait
import concurrent.futures
import time

URLS = ['http://www.foxnews.com/',
        'http://www.cnn.com/',
        'http://europe.wsj.com/',
        'http://www.bbc.co.uk/',
        'http://some-made-up-domain.com/']

def load_url(url):
    time.sleep(1)
    return url

with concurrent.futures.ThreadPoolExecutor(max_workers=3) as executor:
    future_to_url = {executor.submit(load_url, url):url for url in URLS}
    print(future_to_url)
    wait_futures = concurrent.futures.wait(future_to_url,2)
    print(wait_futures)
执行结果
{<Future at 0x1debd2d9400 state=running>: 'http://www.foxnews.com/', <Future at 0x1debd687c18 state=running>: 'http://www.cnn.com/', <Future at 0x1debd687dd8 state=running>: 'http://europe.wsj.com/', <Future at 0x1debd687f98 state=pending>: 'http://www.bbc.co.uk/', <Future at 0x1debd696080 state=pending>: 'http://some-made-up-domain.com/'}
DoneAndNotDoneFutures(done={<Future at 0x1debd2d9400 state=finished returned str>, <Future at 0x1debd687c18 state=finished returned str>, <Future at 0x1debd687dd8 state=finished returned str>}, not_done={<Future at 0x1debd696080 state=running>, <Future at 0x1debd687f98 state=running>})
分析:
- 模拟了两个set都有future的情况
使用as_completed
import concurrent.futures
import time

URLS = ['http://www.foxnews.com/',
        'http://www.cnn.com/',
        'http://europe.wsj.com/',
        'http://www.bbc.co.uk/',
        'http://some-made-up-domain.com/']

def load_url(url):
    return url

with concurrent.futures.ThreadPoolExecutor(max_workers=3) as executor:
    future_to_url = {executor.submit(load_url, url):url for url in URLS}
    print(future_to_url)

    completed =  concurrent.futures.as_completed(future_to_url)
    print(completed)
    for future in completed:
        url = future.result()
        print(url)
    time.sleep(1)
    print(next(completed))
执行结果
{<Future at 0x23d9fd5e978 state=finished returned str>: 'http://www.foxnews.com/', <Future at 0x23da02762e8 state=finished returned str>: 'http://www.cnn.com/', <Future at 0x23da027c438 state=finished returned str>: 'http://europe.wsj.com/', <Future at 0x23da027c588 state=pending>: 'http://www.bbc.co.uk/', <Future at 0x23da027c710 state=pending>: 'http://some-made-up-domain.com/'}
<generator object as_completed at 0x0000015681D73ED0>
http://europe.wsj.com/
http://www.foxnews.com/
http://www.cnn.com/
http://www.bbc.co.uk/
http://some-made-up-domain.com/
Traceback (most recent call last):
  File "F:/python_test/hello.py", line 232, in <module>
    print(next(completed))
StopIteration
分析:
- future集合
future_to_url按列表顺序插入,但产物的返回结果是按照任务完成时间排序。 completed是一个迭代器,当迭代完后再执行next()会产生StopIteration错误
6. 模块总结
Executor.map()函数返回结果的顺序与调用开始的顺序一致。如果前一个调用生成结果的时间是长于后续调用,会堵塞后续结果的显示。举个例子:如果第一个调用生成结果用时 10 秒,而其他调用只用 1 秒,代码会阻塞 10 秒,然后获取产出的第一个结果,然后后续结果会同步显示(按顺序显示)。因为后续的调用已经结束,只是在等待第一个调用。这个用法的效果是:必须等到获取所有结果后再进行下一步的处理。
通常使用的方式:不管提交的顺序,只要有结果就获取。即使用
executor.submit()和futures.as_completed()这个组合。而且还更灵活。因为submit()方法能处理不同的可
调用对象和参数,而executor.map()只能处理参数不同的同一个可调用对象。此外,传给 futures.as_completed 函数的期物集合可以来自多个 Executor 实例,例如一些由
ThreadPoolExecutor 实例创建,另一些由ProcessPoolExecutor 实例创建。
参考文章
https://www.ibm.com/developerworks/cn/linux/l-async/
There are 0 comments